Apr 17, 2023

Roblox Game Coding Tutorial for Beginners
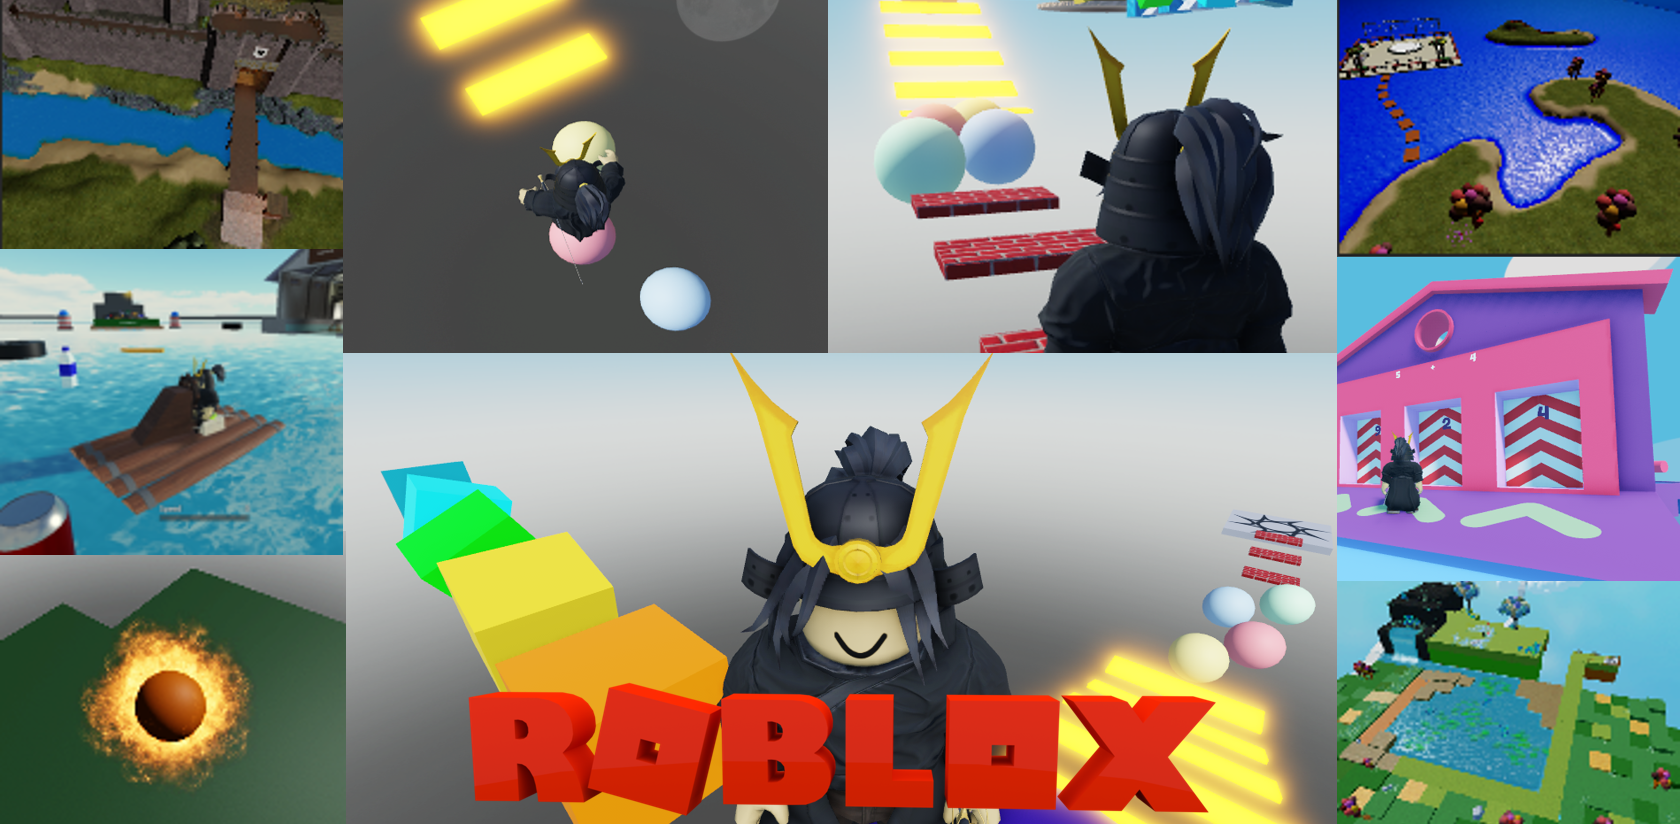
Roblox Game Coding Tutorial for Beginners image

Roblox is a gaming platform that gives its users and players freedom to create and play their own games worldwide.

The experience of playing Roblox which is simulate the real world becomes a special excitement for the players. The games in Roblox also have various challenges so that people don’t easily get bored playing Roblox.

People who play games as their hobby will eventually wonder how they make games in Roblox and want to create their own games. However, a lot of people give up early because they think creating a Roblox game requires some advanced coding skills.

Do you experience the same feeling? Don’t worry because the following blog is a tutorial on how to create a Roblox game for Beginners, for those who’s trying out coding for the first time and for those who don’t have experience creating a game at all.

Before we start creating a game, you have to prepare the following things:

  • Create a Roblox account on the Roblox Official website (could be the same account you use for playing)
  • Download the Roblox Studio application from the official website
  • Require a Mouse
  • Remember how to operate the Mouse and Keyboard in Roblox Studio according to the following table

Mouse Control.png

So if you’re ready, let’s follow the steps below to start making your first Obby game!

Try out the completely game on the following link: My First Obby

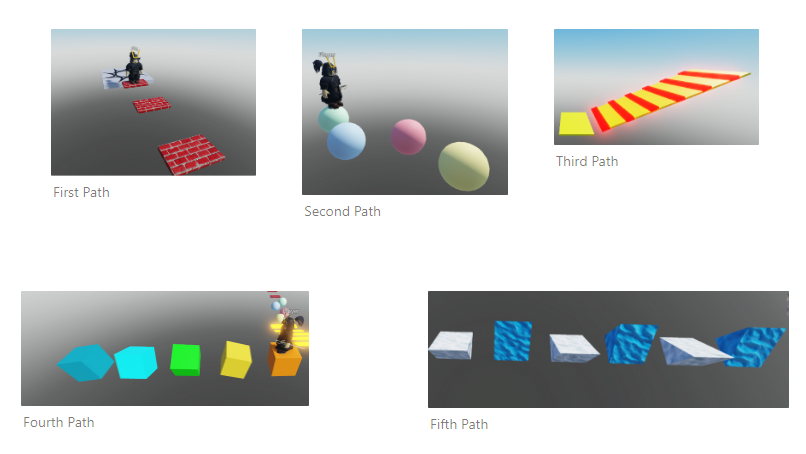
This Obby game is inspired by the Mega Easy Obby game which has many varied obstacles. Now in this tutorial, we will make a total of 6 kinds of obstacles. To make it easier for you to learn, this article will be divided by the type of obstacles you will create while learning how to use the tools in Roblox Studio!
Create New Project

Open the Roblox Studio in your computer. You will see this appearance.Choose Baseplate.png
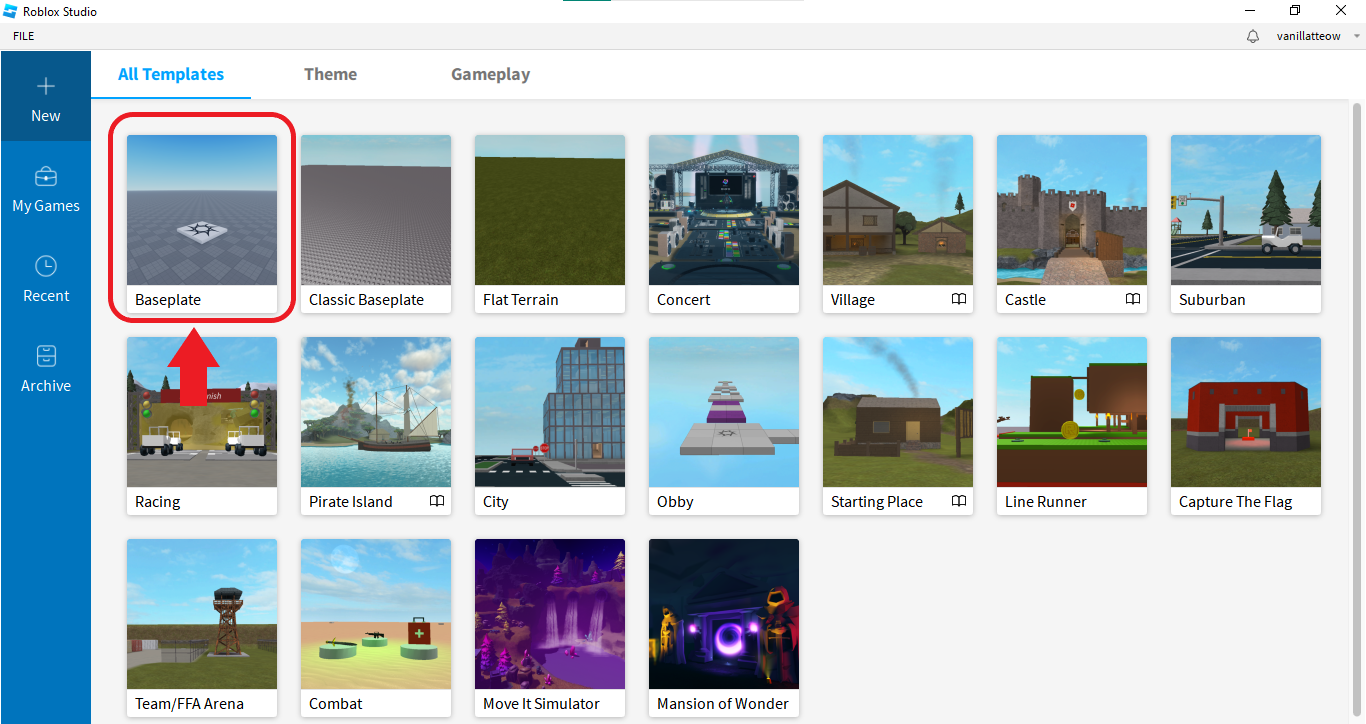
Select the Baseplate and make sure the appearance looks like the image below.
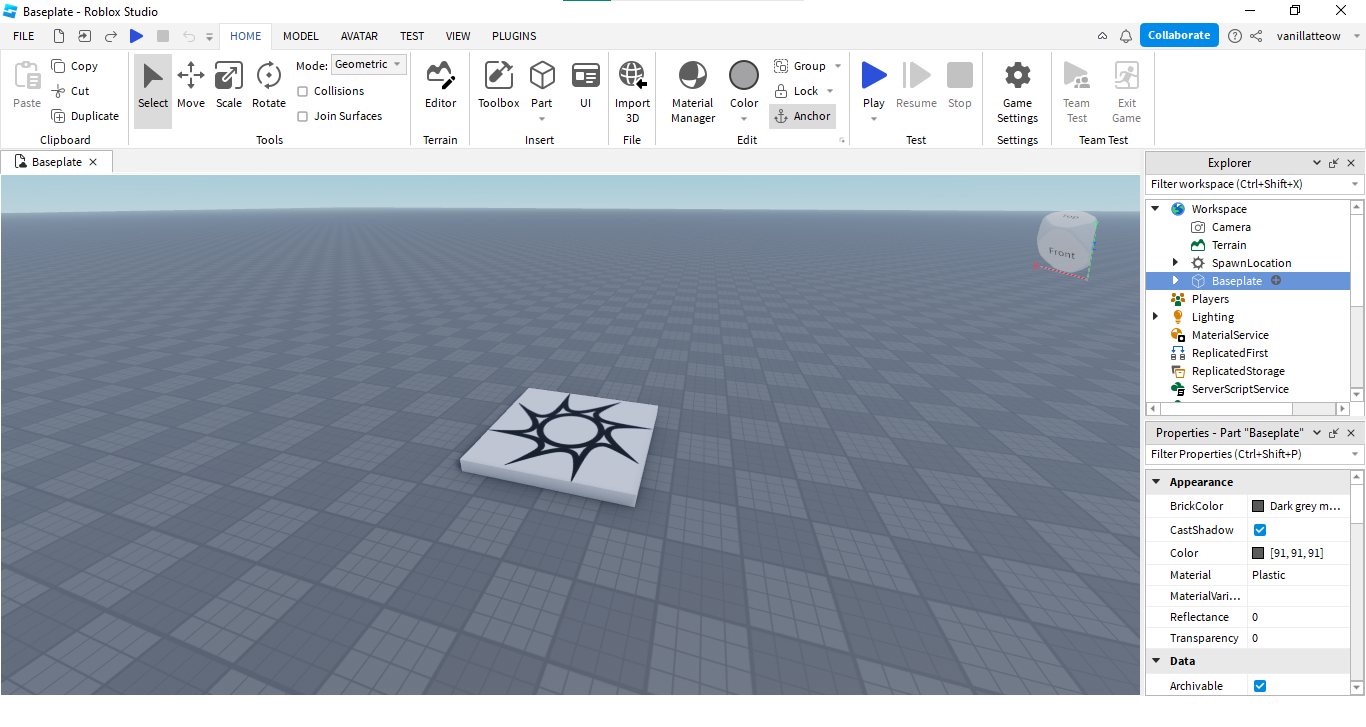
Baseplate Open.png


If the Explorer Bar and the Properties doesn’t appear on the right side, click on the View Menu on top and click the options Explorer and Properties.

View Menu.png

If there is a Bar on the left side that is open, you can just close it because we don’t use it, so it will not interfere your view in the Editor. Click the Close button.
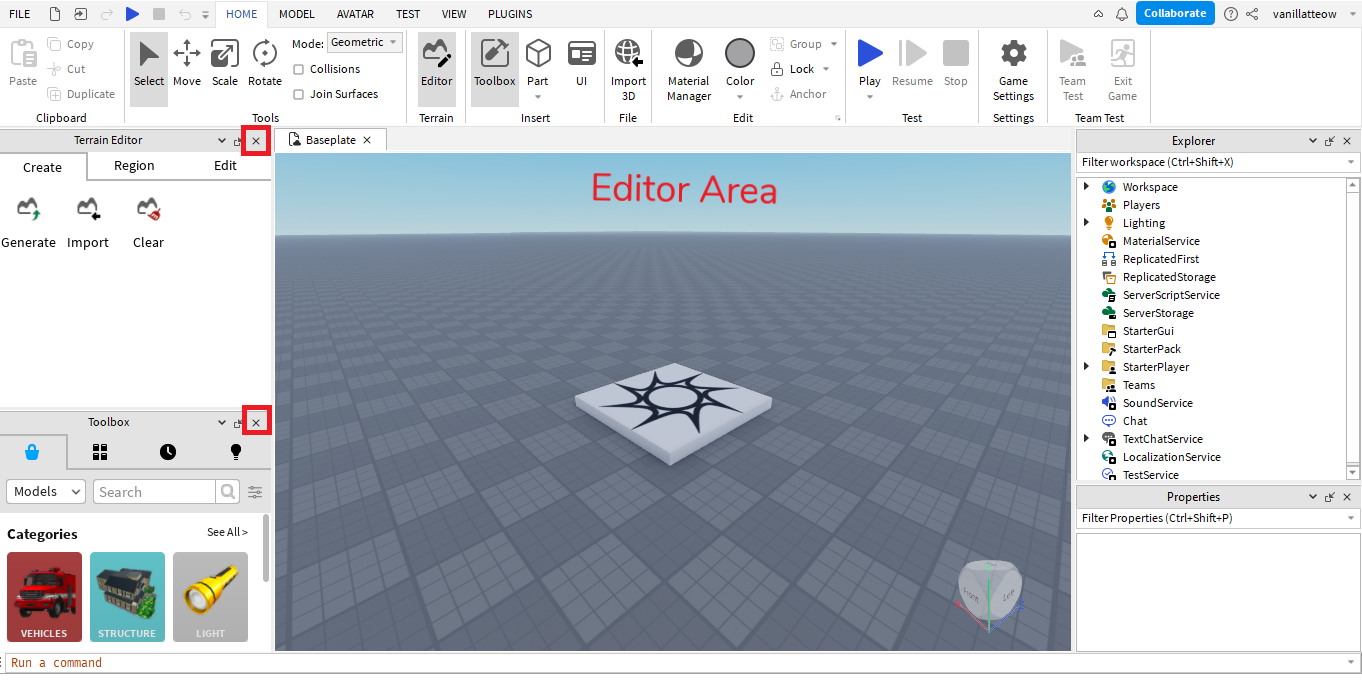
Close Left Bars.png

Because we don’t need the Baseplate, we can delete it by going to the Explorer Bar on the right. Right click on the Baseplate then select Delete. You can also use the Delete key on the keyboard.

Delete Baseplate.png

Has your Baseplate disappeared from the Editor?

Great! Now let’s start building the Game!


Create Path 1

First Path.png

Making the first Path is super easy! Follow the steps below to create Path 1:

Add a new Part via the Home Menu. Click Blocks and make sure it appears above the Spawn Point.
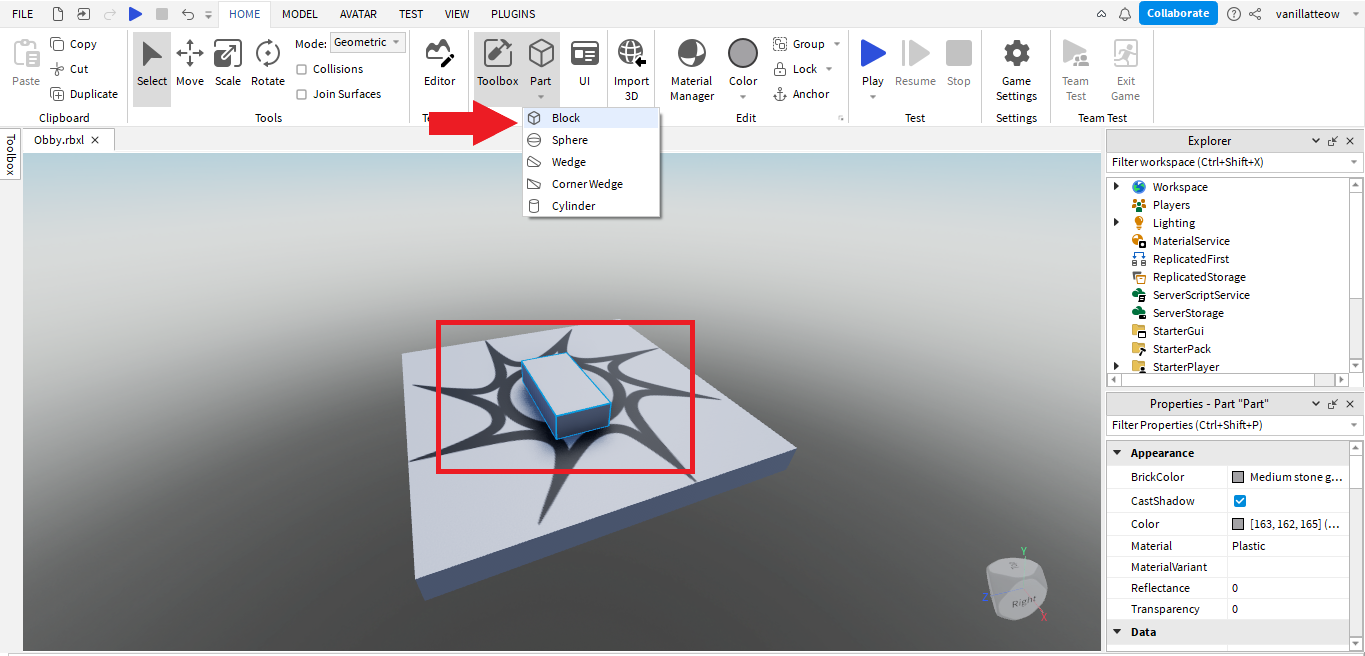
Add New Part.png

Do you still remember how to operate the Mouse and Keyboard mentioned above?

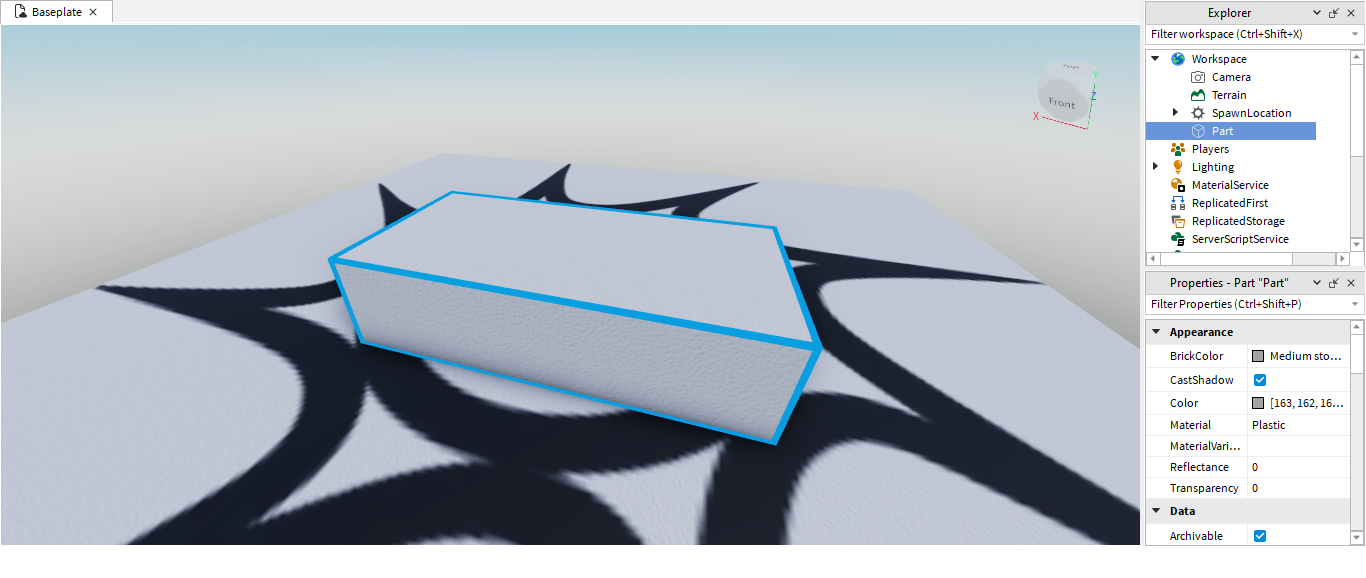
Click F on the Keyboard to bring Camera closer to the Block
Focus.png
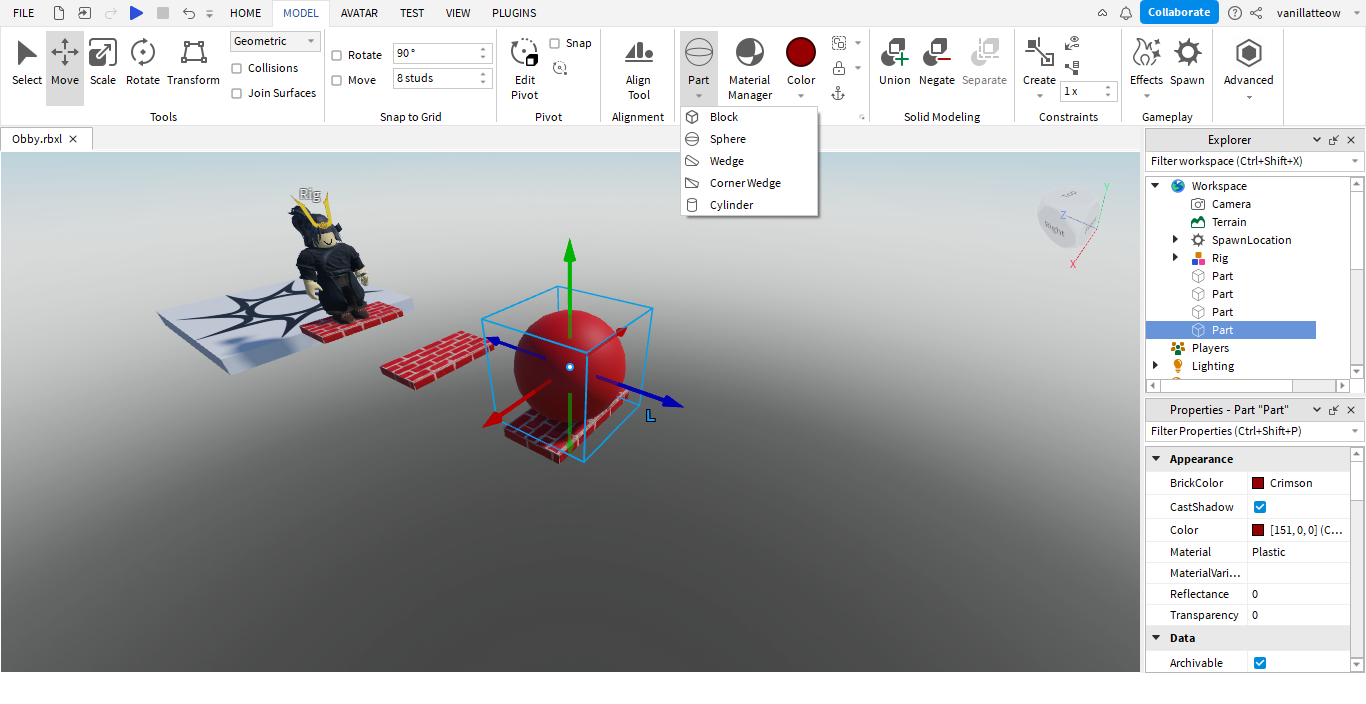
Now we are going to resize the Blocks, but to get the right size you can add a Player Dummy.

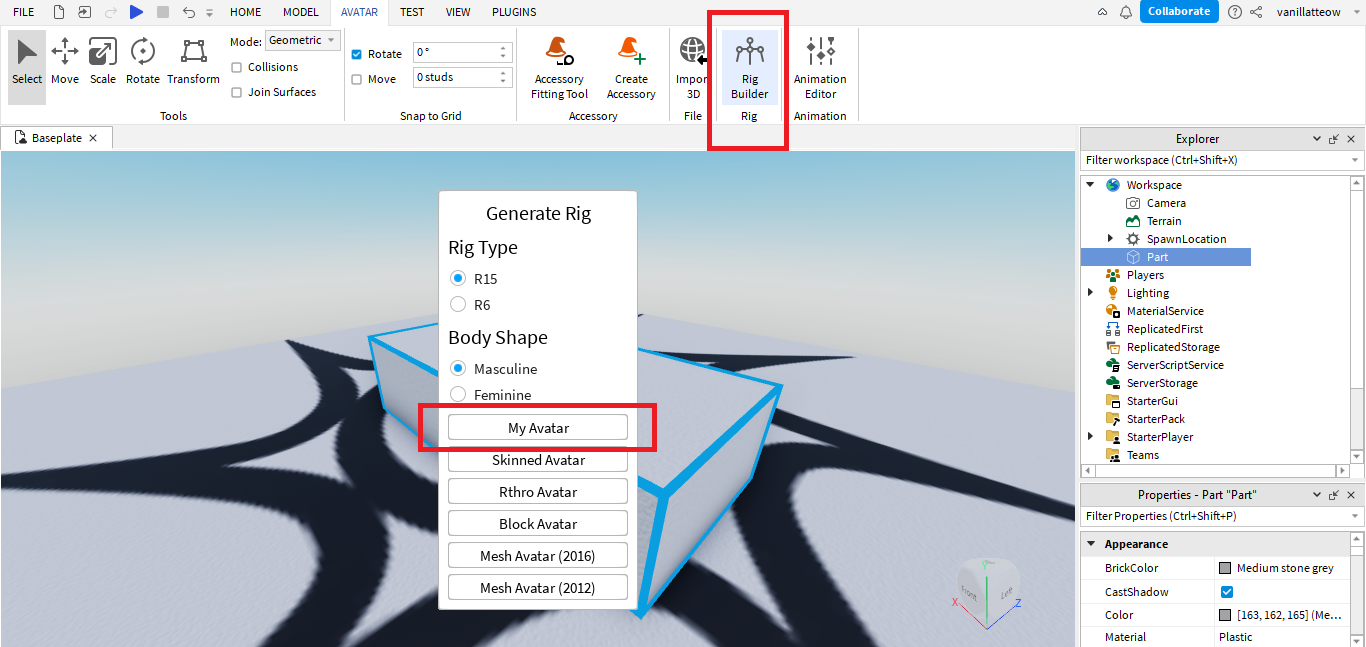
Go to the Avatar Menu at the top, click Rig Builder. Now for the type of Rig you can choose whichever you want! The following example will use My Avatar.
Spawn Rig.png
If it has been clicked, your Avatar Character will appear in the Editor.

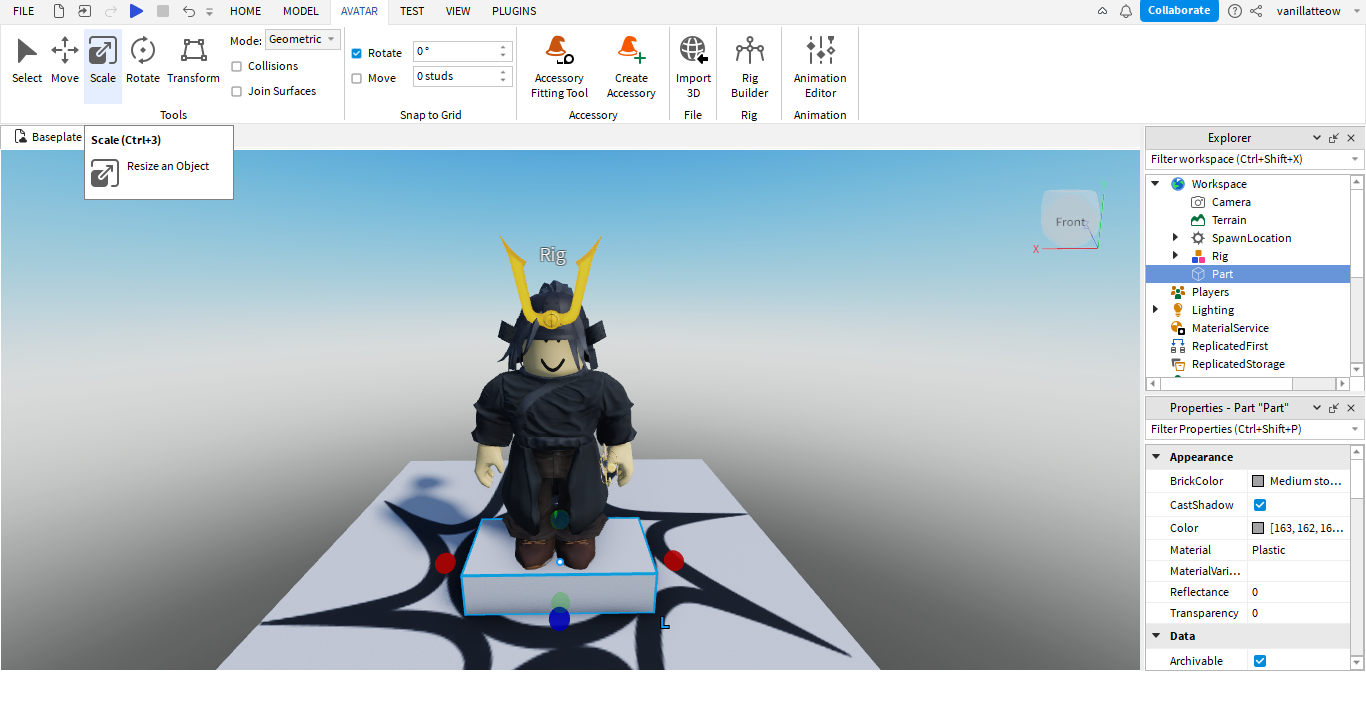
Now it’s time to resize the Blocks using the Scale tool.

Go to the Home Menu at the top and click on the Scale option. Roblox is a 3D design editor which means each object will have 3 Vectors, namely X, Y, and Z which are distinguished by the colors Red, Green, and Blue.
Scale.png
So drag the round sign to resize it. Set the right size for Player.

Now, let’s change the Material and Color!

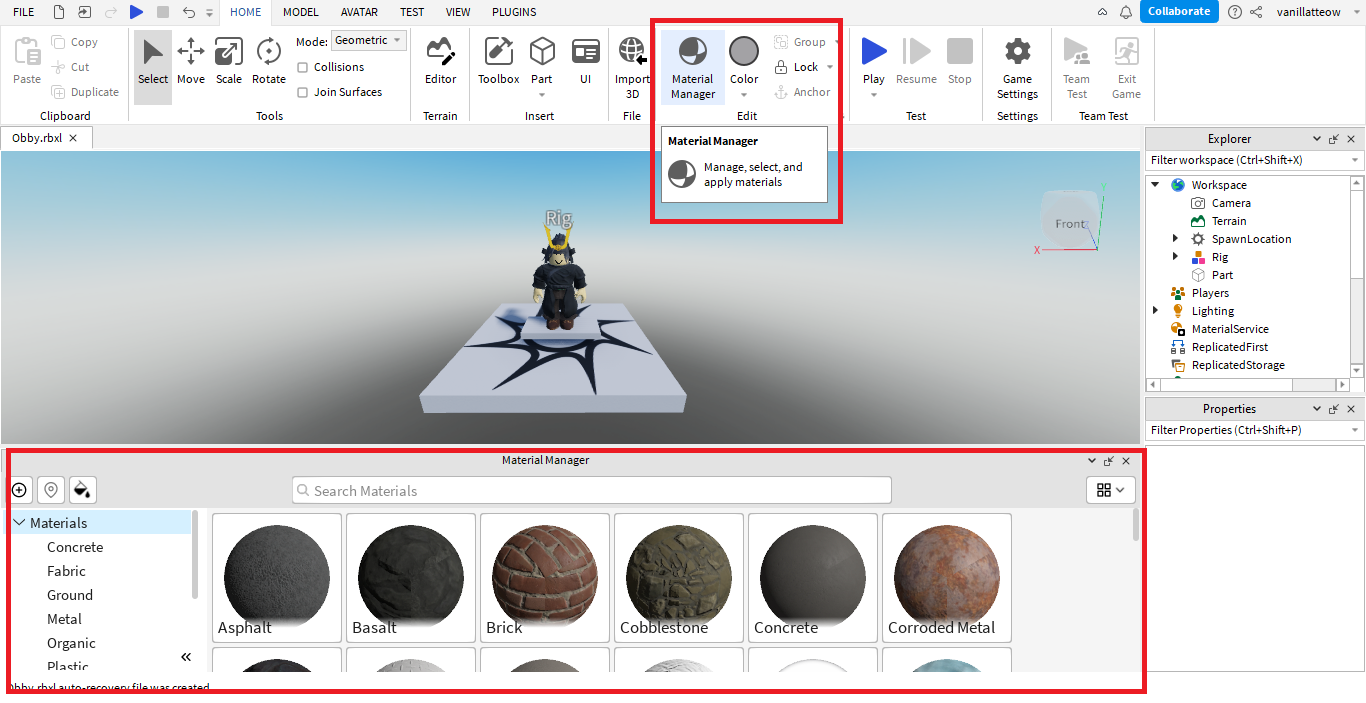
To change the material, click on the Material Manager in the Home menu at the top and the Material Manager bar will appear. This is where you can set whatever material you want.
Material.png

Point the mouse to the desired material then you have to click the arrow button on the top right to apply the material to the Block. For example, use the Brick material.
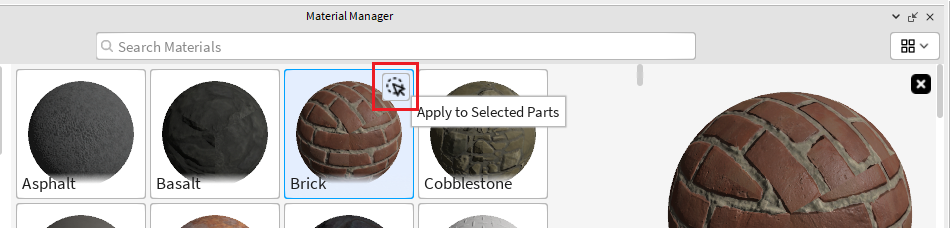
Select Material.png


Then the result will look like this:

New Material.png


Then change the color of the Block by clicking the Color option in the top Home Menu and selecting the desired color. For example, the color Crimson.
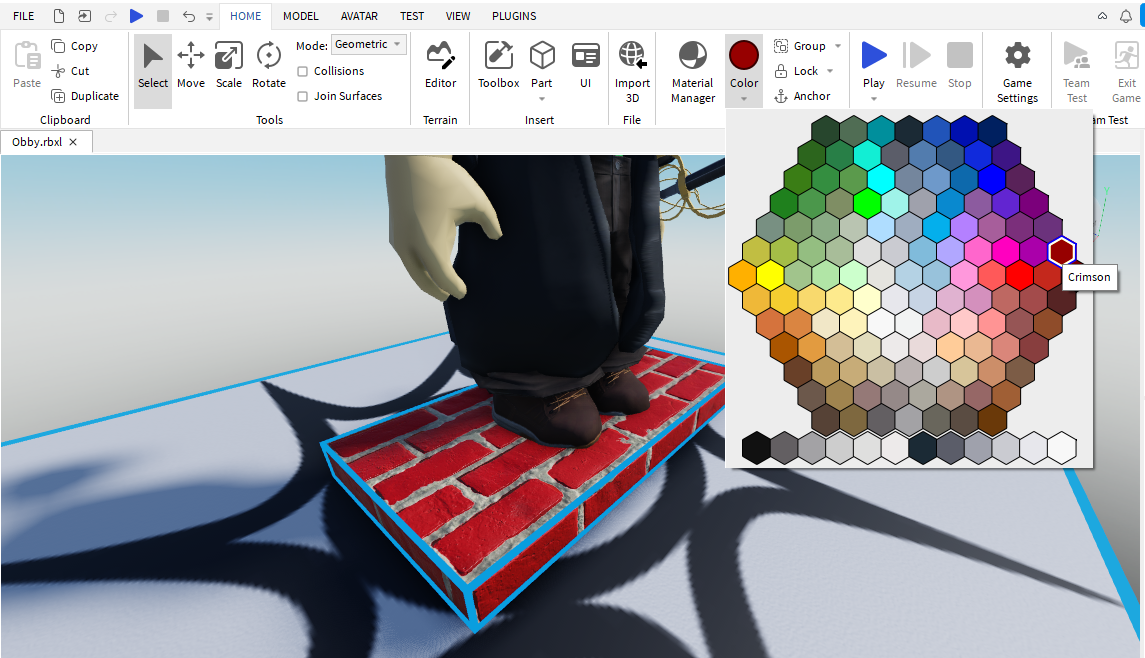
New Color.png


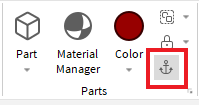
Finally, activate the Anchor property so that the Block doesn’t fall while playing and locked in its current position.Anchored.png
Let’s duplicate it into 3 pieces. But before that, first turn on Snap to Grid so that each Block has the same distance.

Go to the Model Menu and turn on Move property on the Snap to Grid section. Set the value to 8 stud
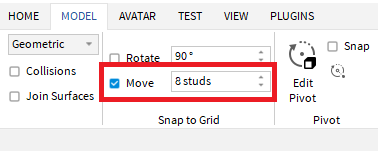
Snap to Grid.png

So now right click on Block and select Duplicate.
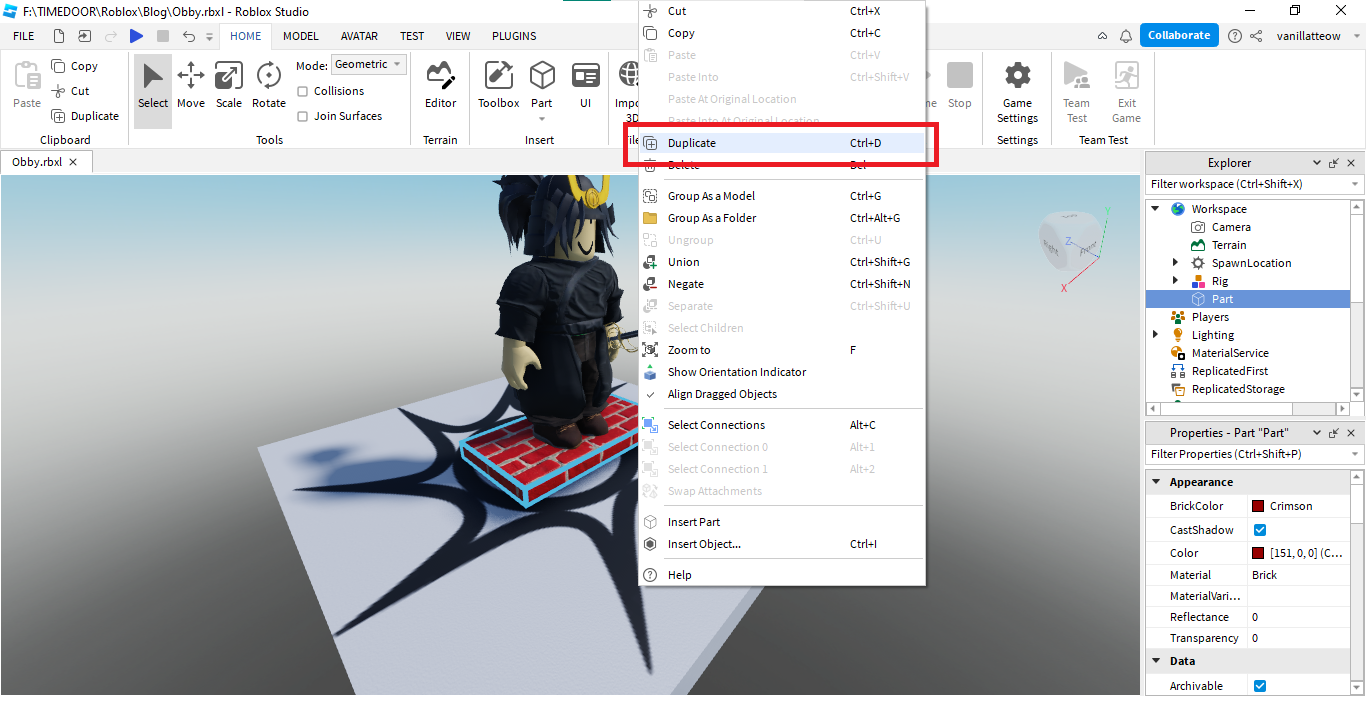
Duplicate.png

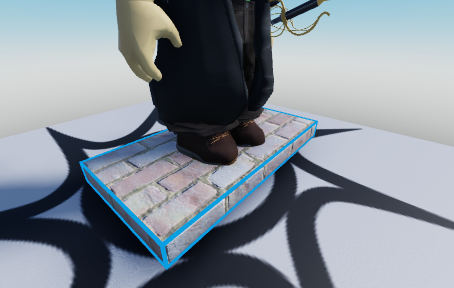
Duplicated Blocks are right in the first Block’s position! So use the Move tool to move it 8 studs.Do the Duplicate step again so that it produces 3 Blocks.
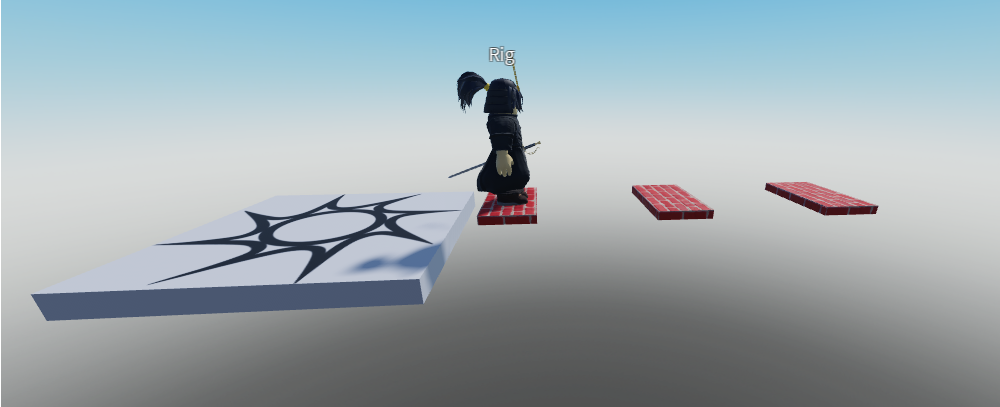
Duplicate Brick.png


Create Path 2

Second Path.png

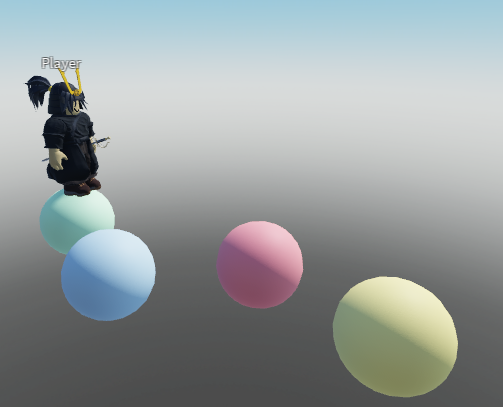
Add a Sphere-shaped Part.

Add Sphere

Move the Sphere as many as 8 studs using the Move tool.

Then change the color just like the image below.
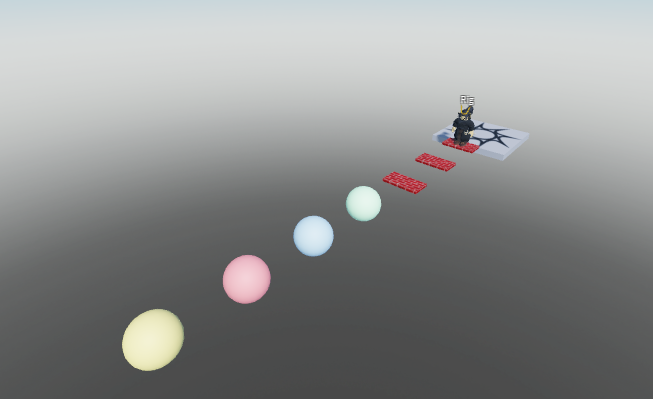
Duplicate Sphere.png
So now we’re going to make the path a little difficult by applying a Zigzag pattern

Turn off Move property on Snap to grid first. Then move it to the right and left using the Move tool. The result should be like thisSecond Path.png


Create Path 3


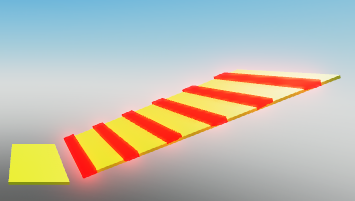
Add Block Part, apply Smooth Plastic Material and the color New Yeller.
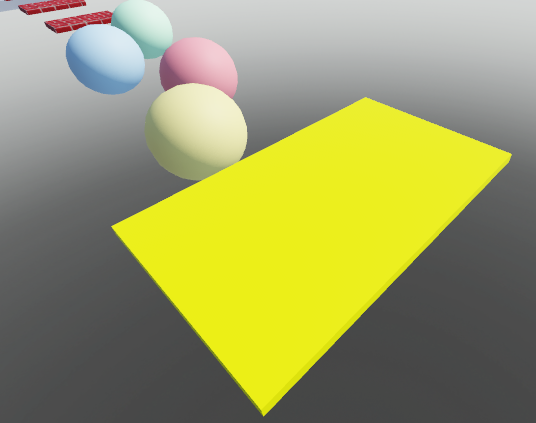
Duplicate and change the Orientation upwards using the Rotate tool. Resize the second Block to be longer.
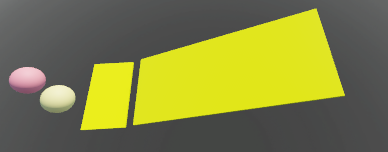
 

Next, we are going to add Kill Bricks on the Blocks.

Duplicate the longer Block, Resize and Place it like the example below. Change the Material to Neon and the Color to Really Red.
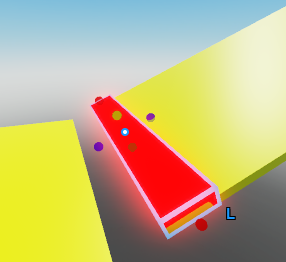
Now, let’s add a Script inside the Kill Brick by hovering your Mouse to the Brick in Workspace and click plus icon. Choose Script.
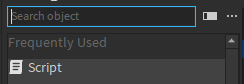
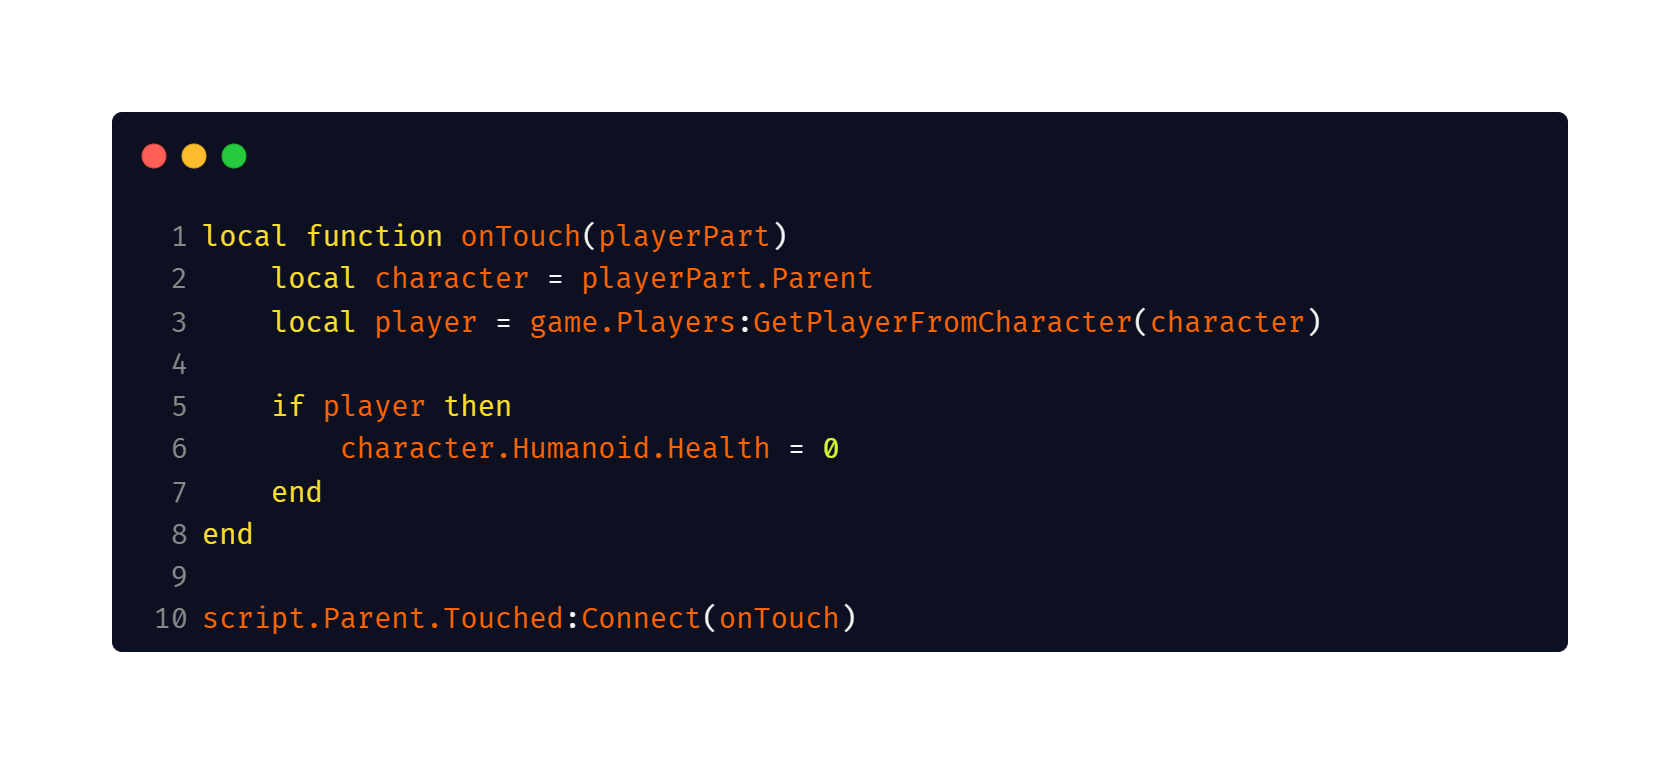
Delete code print(“Hello World”) and type the following code.


Duplicate Kill Brick multiple times until it covers the Block like this.
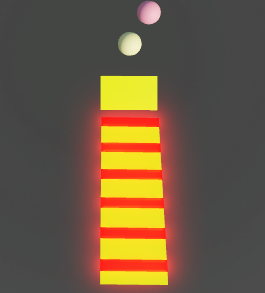
And voila! The Kill Bricks obstacle are ready!


Create Path 4
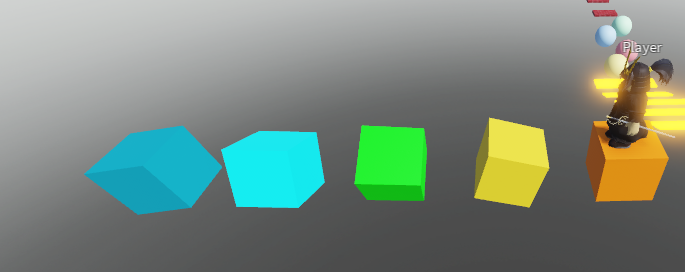
Fourth Path.png


Before creating Path 4, let’s add a Sphere first
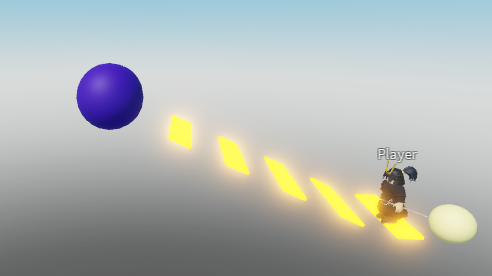
Blue Sphere.png


Now add a Block Part and set the size to be a cube. Use Plastic material and set the color to Orange.
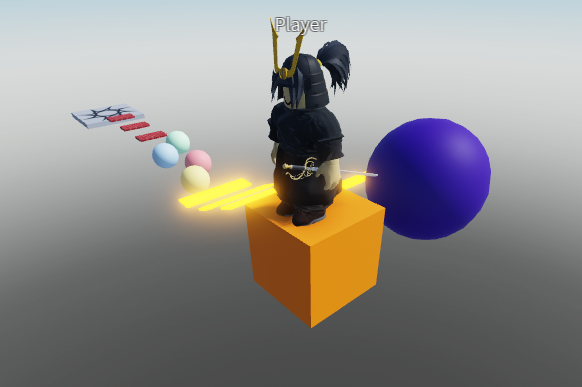
New Cube.png


Duplicate and change the Orientation so the obstacles become more challenging.

Fourth Path.png


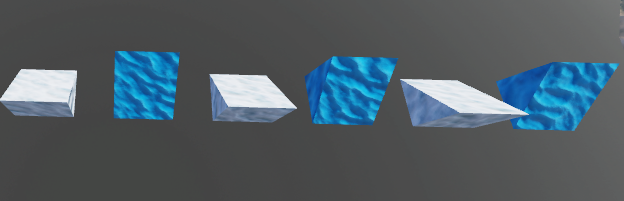
Create Path 5

Fifth Path.png

Now let’s use the Wedge Part for Path 5!

Add Wedge Part and adjust its size using the Scale tool.

New Wedge.png


Duplicate the Wedge Part and move it 8 Studs apart. Remember to use Snap to Grid!

Then turn on the Rotate property value of 180 degrees on the Snap to Grid option so that the second Wedge faces the other way.
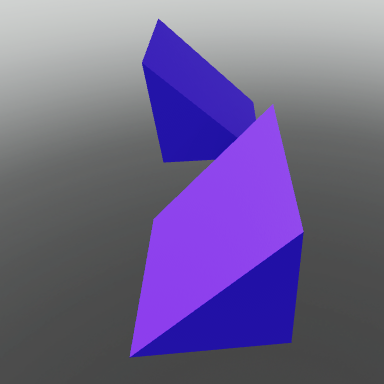
2 Wedges.png


Next, change the Material to Sand and the Color to White and Blue. We will make 6 Wedges, so duplicate the 2 Wedges at once by blocking both Wedges and duplicating them.
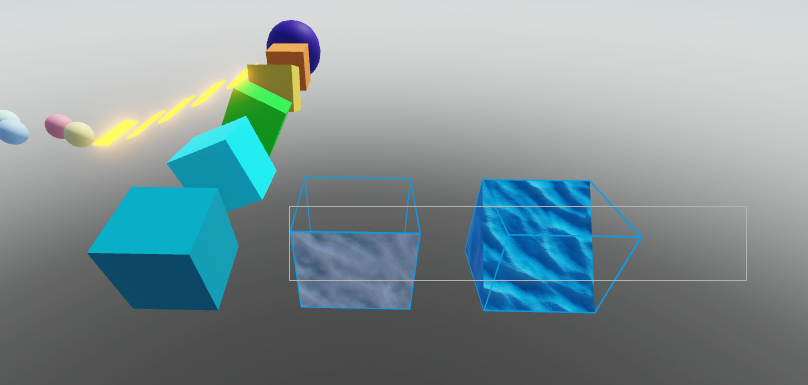
2 Wedges Selected.png


Challenge: Create Finish Point

Try using the Cylinder Part with a size and position like this independently. Duplicate it and stack it upwards by varying the color from a lighter color to a darker color.
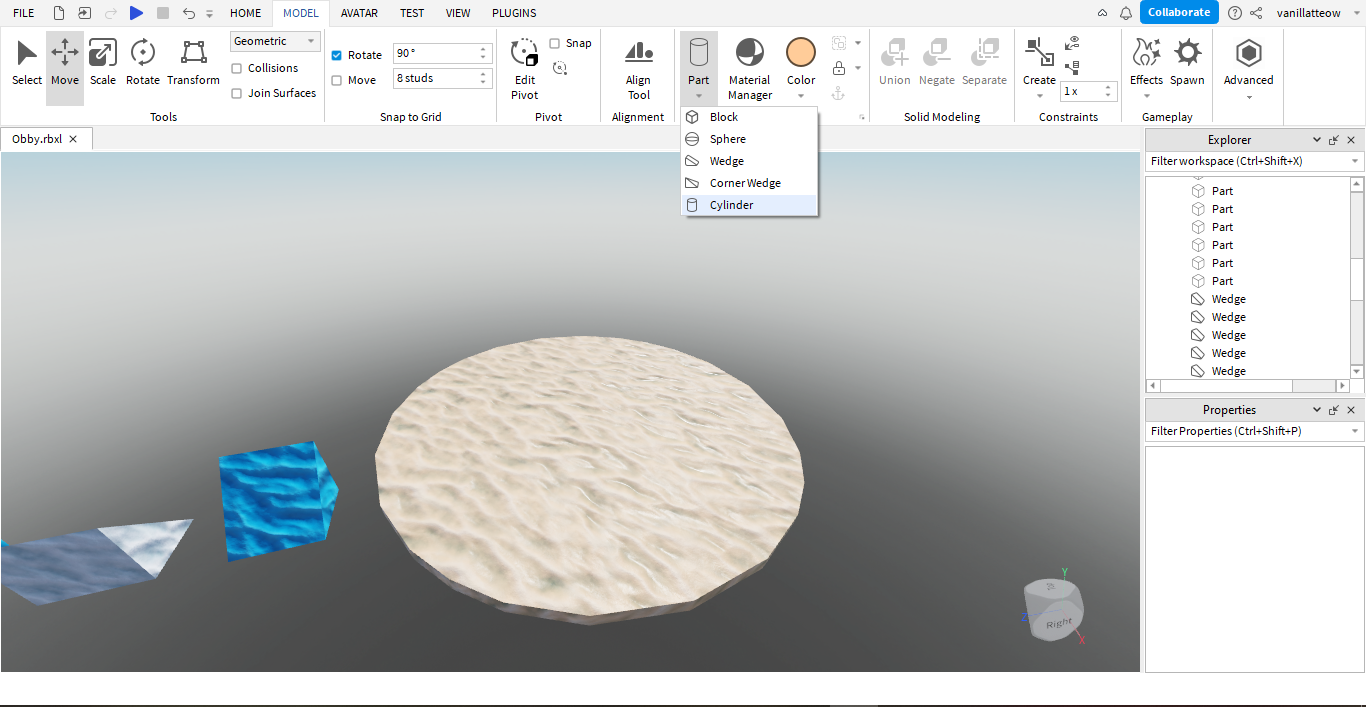
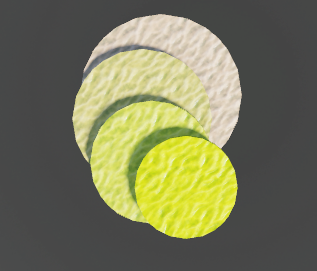
New Cylinder.png

Challange.png

Lastly, don’t forget to Anchor all the Parts together! Use the Scroll Wheel to Zoom Out and block block all the parts. Then click on Anchor.
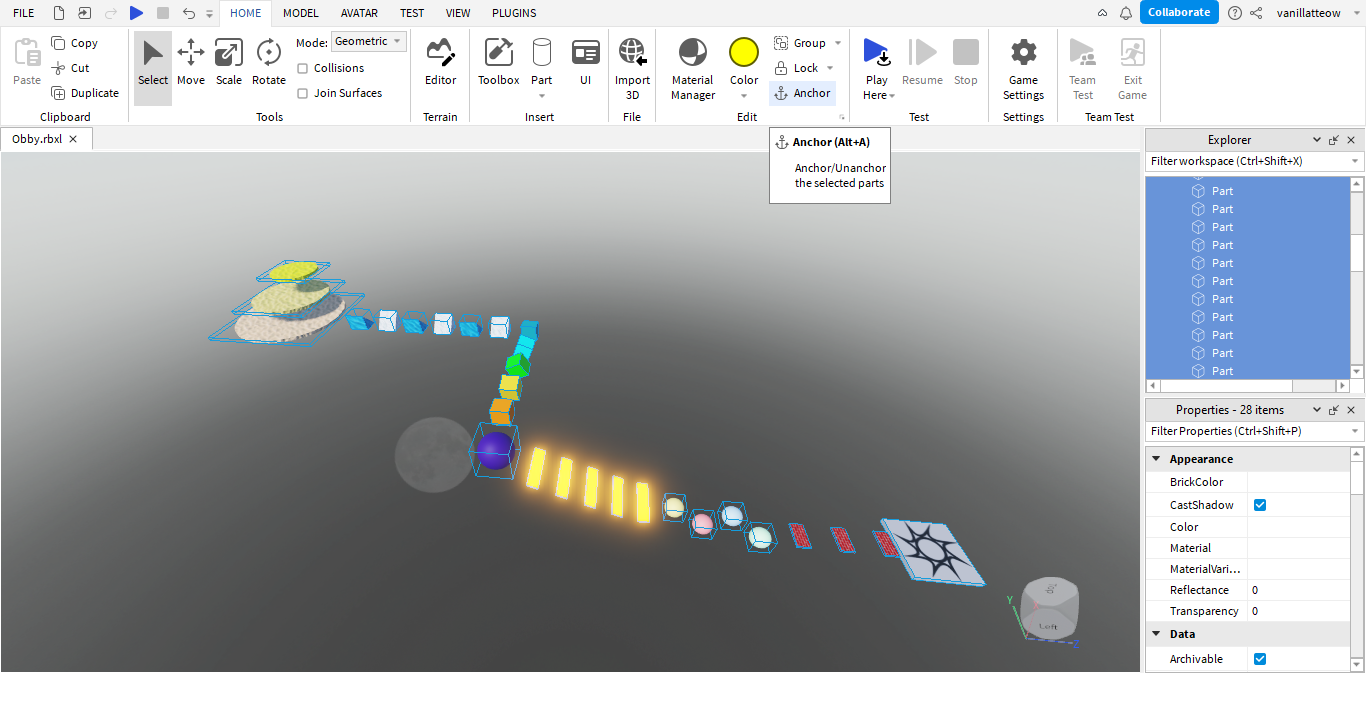
anchor all

It’s Finish! Use the Play button in the Home menu to test out your first Roblox Game!
Play.png


Timedoor Academy provide Roblox Program for Kids and Teens, check this Roblox Introduction Video out!

Keep Reading

5 Top Public Speaking Course for Kids Recommendations with Pricing 2025
In today’s modern era, many parents are looking for public speaking course for kids since public speaking skills are incredibly important for developing children’s confidence and social abilities. No wonder more and more parents are seeking a trusted online public speaking course for kids to help their children communicate ideas clearly, whether at school or in their daily lives. By enrolling in a high-quality online public speaking course, children can practice structured speaking, overcome stage fright, and build real confidence. Below are 5 top recommendations for online public speaking courses for kids in 2025, complete with pricing, programs, and standout features. 1. Outschool: Public Speaking for Kids Price: Starting at $18 per classOutschool offers a wide range of online public speaking course options for kids ages 5–14. Classes include small group sessions focused on storytelling, presentations, and confidence building. Key Features: Flexible class schedules and certified instructors Engaging, project-based lessons Classes available for various age groups and skill levels Reviews and ratings from parents and students Access: 100% Online, Global 2. Udemy: Public Speaking for Kids and Teens Price: Starting at $20 per course (one-time payment)Udemy’s online public speaking course for kids and teens covers everything from basic speech techniques to delivering presentations with confidence. The curriculum is video-based and can be accessed at any time. Key Features: Lifetime access to lessons and resources Self-paced learning for maximum flexibility Activities and practice prompts for real-life speaking Completion certificate Access: Online, Worldwide 3. PlanetSpark Price: Starting at $30 per sessionPlanetSpark offers live, interactive online public speaking coursefor kids aged 6–16. Their curriculum covers debating, storytelling, stage presence, and leadership. Key Features: Personalized learning plans Regular feedback and progress tracking International student community Events, competitions, and showcases Access: Online, International 4. Speech & Debate Academy by Learn with Leaders Price: Starting at $50 per monthThis online public speaking course is led by instructors from top global universities and focuses on helping children master public speaking, debating, and critical thinking. Courses are available in group or one-on-one formats. Key Features: Small class sizes with personalized feedback Emphasis on confidence, persuasion, and communication skills Interactive debates and speech simulations Global exposure Access: Online, Open Worldwide 5. Kid Power Academy Price: Starting at $25 per group classKid Power Academy provides a highly interactive online public speaking course for kids, helping them practice speeches, interviews, and presentations in a supportive environment. Key Features: Certified, experienced instructors Fun activities including storytelling, games, and roleplay Progress reports for parents Focus on building positive self-image and confidence Access: Online, Available Globally Why Is an Online Public Speaking Course Important for Kids? Enrolling your child in an online public speaking course for kids will give them an essential foundation for the future. Children will learn how to organize their ideas, speak confidently in public, and present themselves well in a variety of situations. These skills are not only useful for competitions or school presentations, but also for developing leadership, teamwork, and self-expression. Alongside communication skills, it’s just as important to help your child develop technology skills such as coding. In today’s digital era, combining public speaking skills with digital literacy will prepare kids to face the challenges of the future with confidence. If you want your child to develop both strong public speaking skills and digital abilities, consider introducing them to creative coding classes at Timedoor Academy. Try a free trial coding class at Timedoor Academy so your child can grow in confidence, creativity, and readiness to compete in the modern world!
Fun Science Experiments For Kids You Can Try at Home in 2025
Children are naturally curious. Unfortunately, that curiosity can fade when learning feels limited to books or school assignments. In reality, learning can be a fun activity you enjoy together at home. One of the best ways to keep your child engaged is through fun science experiments for kids. These experiments are not just for fun. They are also a simple and effective way to introduce basic concepts of logic, cause and effect, and help children develop structured thinking. Plus, they offer valuable quality time for parents and children to bond. Why Should You Try Science Experiments at Home? Before we dive into the examples, it is worth understanding why fun science experiments for kids are so beneficial. First, kids learn better when they can see and experience things directly, rather than just reading about them. Second, it shows children that learning is not always about sitting still at a desk. Third, it creates opportunities for meaningful parent-child interaction through shared learning moments. Simple and Fun Science Experiments For Kids No need for complicated tools. Most of these activities use everyday items you probably already have at home. 1. Baking Soda and Vinegar Volcano A timeless experiment that never fails to impress. Build a small “volcano” from clay or playdough around a container, add baking soda, then pour vinegar mixed with food coloring. The result is a small lava-like eruption that kids will love. 2. Walking Water Rainbow Line up cups filled with colored water, placing empty cups in between. Connect them with folded paper towels. Over time, the water will "walk" through the towels and mix colors, creating a rainbow effect. This is a fantastic visual example of capillary action and a perfect fun science experiment for kids. 3. DIY Lava Lamp Using a plastic bottle, add vegetable oil, water, food coloring, and an effervescent tablet. Watch as colorful bubbles rise and fall, mimicking a lava lamp. This teaches kids about density and simple chemical reactions. 4. Magic Milk Pour milk into a shallow dish, add drops of food coloring, then touch the surface with a cotton swab dipped in dish soap. The colors will swirl and move due to changes in surface tension. This fun experiment also sparks curiosity about how molecules interact. 5. Static Electricity Butterfly Cut a butterfly shape from tissue paper, rub a balloon on your hair, then bring it close to the paper. The butterfly wings will "lift" due to static electricity. This simple and entertaining activity helps children understand basic physics concepts. From Science to Coding: Training a Child’s Logical Thinking At first glance, these fun science experiments for kids might seem simple. However, they actually help develop logical thinking, patience, and step-by-step problem-solving. These are the same foundational skills used in coding. Coding teaches children to break down complex problems into smaller tasks, much like the scientific process in experiments. Both require focus, precision, and persistence. If children become familiar with structured thinking through simple science activities, transitioning to coding will feel like a natural and enjoyable next step. Tips to Keep Home Experiments Fun and Stress-Free To make sure your experiments go smoothly and your child stays excited, keep these tips in mind: Safety first. Always supervise, even when using everyday materials. Get your child involved from the start. Let them help prepare and take ownership. Do not fear failure. Mistakes are valuable learning opportunities. Relate experiments to everyday life. Show how science is all around them. Learning Can Be Fun and Practical By doing fun science experiments for kids, parents can make learning more enjoyable and hands-on. It allows children to experience cause and effect directly, beyond memorizing facts from a textbook. If you want to take it a step further, introducing your child to coding is another great way to develop structured thinking. Coding helps children stay focused, think logically, and persevere through challenges. Try a Free Coding Class with Timedoor Academy If you are looking for a way to combine fun and learning, Timedoor Academy offers free coding classes for kids. The lessons are interactive, engaging, and designed to match your child’s age and learning pace. Sign up today and help your child sharpen their logical thinking skills from an early age: Join Timedoor Academy's Free Coding Trial Class
<strong>5 Effective Ways on How to Deal with Children Addicted to TikTok</strong>
5 Effective Ways on How to Deal with Children Addicted to TikTok
How to deal with children addicted to TikTok has become an important concern for many parents in today’s fast-paced digital world. TikTok has quickly become a favorite platform among kids and teens, offering endless short-form videos that are entertaining and easy to access. It’s not uncommon for children to spend hours glued to their screens with little self-control. While it may seem like harmless fun, excessive use can lead to behavioral issues, loss of concentration, and declining academic performance. That’s why parents must understand and apply the right strategies early on before the habit turns into a more serious developmental issue. Why Do Kids Get Addicted to TikTok? TikTok is designed to serve continuous streams of personalized content. Its algorithm tracks user behavior to deliver videos that are highly engaging, making kids feel endlessly entertained. This makes it hard for them to stop watching or concentrate on schoolwork. Many children would rather scroll through TikTok than do homework or even play outside. This growing trend shows that how to deal with children addicted to TikTok is not just about limiting screen time but also about understanding the reasons behind their behavior. With the right approach, parents can redirect their children’s attention to healthier digital and social activities. 5 Effective Ways on How to Deal with Children Addicted to TikTok 1. Set Reasonable Screen Time Boundaries The first step in how to deal with children addicted to TikTok is establishing clear, reasonable screen time rules. For example, allow TikTok use only after homework is done and limit usage to one hour per day. Use parental control features if needed, and explain to your child why these rules are important. 2. Offer Fun and Engaging Alternatives Banning TikTok without providing alternatives will only frustrate your child. Instead, introduce fun activities such as outdoor play, painting, reading interactive stories, or making crafts. Filling their time with positive experiences is a smart move in how to deal with children addicted to TikTok so they won’t become overly dependent on their devices. 3. Have Open, Non-Judgmental Conversations Ask your child what they enjoy most about TikTok. Is it the humor, interesting content, or peer influence? Understanding their motivation helps you support them better. Keep the conversation open and empathetic, and involve them in setting healthy media habits. 4. Improve the Learning Environment at Home Many kids find home learning dull. Change your teaching style to make it more interactive using games, visual media, or hands-on activities. When children enjoy the learning experience at home as much as they do on TikTok, they’ll be more willing to engage. 5. Introduce Empowering Technology Activities Shift your child’s focus from passive content consumption to active digital engagement like learning coding. Not only is this stimulating and fun, but it also equips them with valuable skills for the future. This approach is a key part of how to deal with children addicted to TikTok by encouraging healthy, constructive interaction with technology. Try a Free Coding Class at Timedoor Academy Rather than cutting children off from the digital world entirely, it’s wiser to guide them toward meaningful and educational tech experiences. One great way to do this is through learning to code. At Timedoor Academy, children are introduced to technology in a hands-on way, helping them build logical thinking and self-confidence through age-appropriate real-world projects. You can sign up for a free coding trial class at Timedoor Academy to experience firsthand how fun and supportive learning can help your child grow. With a positive learning environment and guidance from professional mentors, your child can shift from passive scrolling to productive and empowering digital activities.
float button